Unlocking Pro Mode on your Samsung camera app opens up a whole new world of creative control. It’s like turning your phone from a simple point-and-shoot into a powerful photography tool. Sure, automatic modes are great for quick, everyday snaps, but Pro Mode gives you the power to manually adjust key settings and capture truly stunning, unique images.
This guide will walk you through each Pro Mode setting on your Samsung device, explain what they do, and show you how to use them effectively. Let’s dive in!
How to Access Pro Mode on Your Samsung Camera
The first step is simple: open your camera app and head into Pro Mode.
- Open the Camera App: Tap on the Camera icon on your Samsung phone.
- Swipe to “More”: At the bottom of the viewfinder, you’ll see a list of camera modes, like “Photo,” “Video,” “Portrait,” and so on. Swipe left to reveal more options, and tap on “More.”
- Select “Pro”: Inside the “More” section, you’ll find several specialized modes. Tap on “Pro” to enter Pro Mode. For video, tap “Pro Video.”
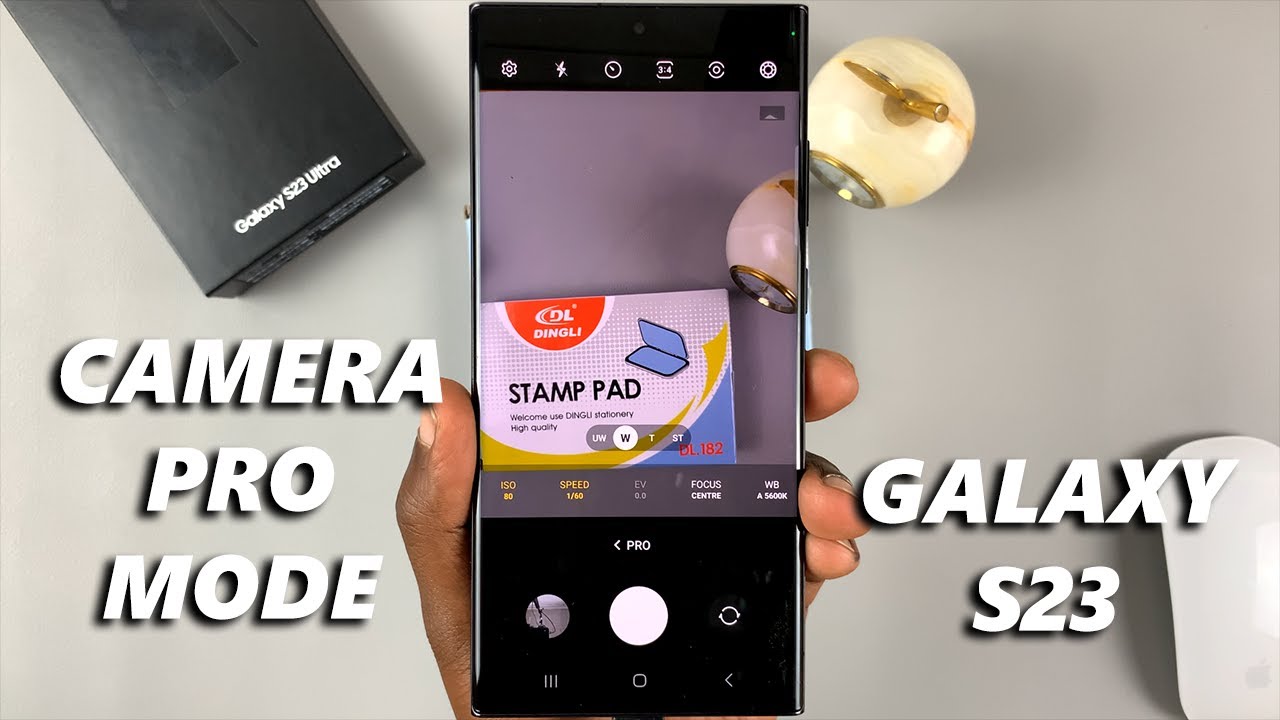
Once you’re in Pro Mode, you’ll notice a new interface with various controls at the bottom and sides of your screen. Don’t be intimidated – let’s break down what everything does.
Understanding Pro Mode Settings
Think of the Pro Mode settings as the manual dials on a traditional camera. You’ve got complete control over how each shot turns out, but don’t worry, I’ll guide you through the key ones.
- ISO (Light Sensitivity)
ISO adjusts how sensitive your camera’s sensor is to light.
- Low ISO (e.g., ISO 50, 100): Best for bright environments. A lower ISO results in cleaner, sharper images with minimal noise (graininess).
- High ISO (e.g., ISO 800, 1600+): Handy in low-light situations. While it brightens up your image, higher ISO can introduce noise, which might make your photo look grainy.
How to Use: Tap the ISO icon (usually labeled “ISO”). A slider will appear – drag it to adjust the sensitivity. Generally, you’ll want the lowest ISO that still gives you a well-exposed image. That way, you minimize the noise.
- Shutter Speed (Exposure Time)
Shutter speed determines how long your camera’s shutter remains open to let in light.
- Fast Shutter Speed (e.g., 1/1000s, 1/500s): Freezes motion. Perfect for fast-moving subjects like athletes or wildlife. Less light enters, so the image might appear darker.
- Slow Shutter Speed (e.g., 1/30s, 1s, 10s): Creates motion blur. This is great for artistic effects like smooth water in landscapes or capturing light trails at night. It lets in more light, so your image will be brighter. (Pro tip: a tripod is essential for slow shutter speeds to prevent camera shake.)
How to Use: Tap the Shutter Speed icon (it usually looks like a camera shutter). Adjust the slider to set your desired speed. If you’re shooting handheld, try to keep the shutter speed at 1/60s or faster to avoid any blur from shaky hands.
- Aperture (Fixed on Most Samsung Phones)
While traditional cameras let you adjust the aperture (the opening in the lens), most Samsung phones come with a fixed aperture (like f/1.7 or f/1.9). A wider aperture (lower f-number) lets in more light and creates a shallow depth of field (blurry background).
Some older or specialized Samsung models might have a dual-aperture lens (e.g., f/1.5 and f/2.4), allowing you to switch between them. If that’s the case for you, you’ll see an icon to toggle between the two.
- Focus (Manual Focus)
Focus determines which part of your image is sharp.
- Manual Focus (MF): Gives you complete control over the focus, which is essential for macro photography or portraits where you want a specific part of the image to be in sharp focus.
- Auto Focus (AF): Automatically tries to find and lock focus for you.
How to Use: Tap the Focus icon (usually a mountain range or “AF/MF”). Switch to Manual Focus (MF). A slider will pop up that lets you adjust the focus. You’ll often see a green highlight showing what’s in sharp focus.
- White Balance (Color Temperature)
White Balance adjusts the color tones in your photos to make white objects appear truly white, no matter the lighting.
- Presets: You’ll often see options like Daylight, Cloudy, Fluorescent, Incandescent, and Auto.
- Kelvin (K) Scale: For more precise control, you can adjust the color temperature manually using the Kelvin scale. Lower values give cooler (bluer) tones, while higher values give warmer (yellow/orange) tones.
How to Use: Tap the White Balance icon (usually a sun or cloud). Choose a preset or use the Kelvin slider to tweak the color temperature. If your indoor photos look too yellow, try a cooler setting.
- Exposure Value (EV)
Exposure Value is a quick way to brighten or darken your image, adjusting the overall exposure without fiddling with ISO, shutter speed, or aperture.
- Positive EV (+ values): Brightens the image.
- Negative EV (- values): Darkens the image.
How to Use: Tap the EV icon (usually a “+/-” symbol) and adjust the slider. This is handy for quick adjustments when your other settings are just about right.
- Metering Mode (Light Measurement)
Metering mode tells your camera how to measure the light in the scene and determine the correct exposure.
- Multi (Matrix/Evaluative): The default setting, where the camera analyzes the entire scene for the best exposure.
- Center-weighted: Measures light mainly from the center of the frame.
- Spot: Measures light from a very specific, small area you select.
How to Use: Tap the Metering Mode icon (often a circle with patterns). Choose the mode that fits your scene. Spot metering is great for backlit subjects or high-contrast situations.
- Filters and Tones
In addition to basic exposure, Pro Mode gives you control over the image’s overall aesthetic.
- Filters: Add creative effects (e.g., vintage, black and white).
- Contrast/Saturation/Highlights/Shadows: Fine-tune the image’s mood. Adjust the intensity of colors, light and dark areas, and overall brightness.
How to Use: Tap the Effects icon or the Tones icon, then adjust the sliders to suit your style. These settings let you add your own personal touch to each shot.
- RAW vs. JPEG (Image Format)
This setting is crucial for serious photographers.
- JPEG: A compressed format, smaller in file size, but you lose some image quality and editing flexibility.
- RAW: An uncompressed format that captures all the data from the sensor. RAW files are much larger but offer a lot more flexibility in post-processing.
How to Use: Go to the camera settings in Pro Mode, look for “Advanced picture options,” and select “RAW and JPEG” or “RAW only” for the best quality. You’ll need a good editing app like Adobe Lightroom to process RAW files.
- Expert RAW (For High-End Samsung Models)
Some higher-end models, like the Galaxy S24 Ultra, include an “Expert RAW” mode. This expands on Pro Mode, adding features like multi-frame RAW capture and astrophotography modes.
If your phone supports it, it’s definitely worth exploring for even more advanced photography.
Advanced Tips for Using Pro Mode
- Use a Tripod: For long exposures or low-light shots, a tripod is essential to avoid any blur from shaky hands.
- Composition is Key: Even with the perfect settings, a poorly composed photo won’t look great. Use composition techniques like the Rule of Thirds or leading lines to improve your shots.
- Practice Makes Perfect: The best way to master Pro Mode is to experiment. Try the same shot with different settings and see how each change affects the final result.
- Check the Histogram: Many Samsung phones display a histogram in Pro Mode, showing the distribution of light in your image. A balanced histogram is usually a good sign of proper exposure.
- Post-Processing: If you shoot in RAW, you’ve got a lot of room to enhance your photos later using apps like Adobe Lightroom.
By familiarizing yourself with the settings in Pro Mode and experimenting with them, you can capture professional-quality photos right from your Samsung phone. It’s all about practice, but once you get the hang of it, the creative possibilities are endless.