Your Samsung phone, like all Android devices, comes with a hidden menu called Developer Options. While primarily designed for software developers to test applications and debug their creations, it also offers a suite of advanced settings that can empower tech-savvy users to customize and optimize their device’s behavior. These options aren’t immediately visible to prevent accidental changes that could impact your phone’s stability or performance.
Unlocking this secret menu is a straightforward process, but it requires knowing where to look. Let’s dive in and get those Developer Options enabled on your Samsung Galaxy device.
What are Developer Options?
Developer Options is a hidden menu within your Android device’s settings that provides access to advanced system controls. These controls are typically used for development, debugging, and performance tweaking. Think of it as the control panel for your phone’s deep-level functions.
Historically, these options became a standard part of Android to allow developers to perform critical tasks like USB Debugging and testing app compatibility across various device configurations. Over time, some of these features have also proven useful for everyday users looking to fine-tune their phone’s performance or diagnose specific issues.
Why Would You Want to Enable Developer Options?
While many of the settings in Developer Options are indeed for developers, several can be beneficial for the average user. Here are a few common reasons why someone might enable them:
- USB Debugging: Essential for connecting your phone to a computer for tasks like transferring files, using Android Debug Bridge (ADB) commands, or rooting your device. ADB is a command-line tool that allows communication with an Android device, facilitating various development and debugging tasks.
- Animation Scales: Adjusting window, transition, and animator duration scales can make your phone feel faster or slower. Setting them to 0.5x can create a snappier user experience.
- Mock Locations: Allows you to simulate GPS locations, which can be useful for testing location-based apps without physically moving.
- Show Taps/Pointer Location: Displays visual feedback on the screen when you touch it, helpful for troubleshooting touchscreen issues or creating screen recordings.
- OEM Unlocking: Enables the unlocking of your device’s bootloader. This is crucial for advanced users who wish to install custom ROMs or recovery images, granting deeper control over the device’s software. Caution: This can void your warranty and has security implications.
- Stay Awake: Keeps the screen on while the device is charging, useful during prolonged testing or data transfers.
- Force Dark Mode: Forces apps that don’t natively support dark mode to display in a dark theme, improving visual consistency and potentially saving battery on AMOLED screens.
How to Enable Developer Options on Your Samsung Phone
The process is consistent across most modern Samsung Galaxy phones running various Android versions.
Step 1: Open Your Phone’s Settings
First, you need to access your phone’s main Settings menu.
- Swipe down from the top of your screen to reveal the Quick Settings panel.
- Tap the gear icon (⚙) in the top right corner. Alternatively, you can find the “Settings” app icon in your app drawer and tap it.
Step 2: Navigate to “About phone”
Scroll down to the very bottom of the Settings menu. You will find an option called About phone. Tap on it.
Step 3: Access “Software information”
Within the “About phone” menu, you’ll see various details about your device. Look for and tap on Software information.
Step 4: Tap the “Build number” Repeatedly
This is the key step. Locate Build number. It’s usually a long alphanumeric string.
- Tap on “Build number” seven (7) times rapidly.
As you tap, you’ll see a small pop-up message appear at the bottom of the screen, counting down the remaining taps (e.g., “You are now 3 steps away from being a developer.”).
Step 5: Enter Your PIN/Pattern/Password (If Prompted)
After tapping seven times, your phone might ask you to enter your screen lock PIN, pattern, or password for verification. This is a security measure to ensure you are intentionally enabling these options. Enter your credentials.
Step 6: Confirmation and Access
Once confirmed, you’ll see a message that says, “Developer mode has been enabled” or “You are now a developer!”.
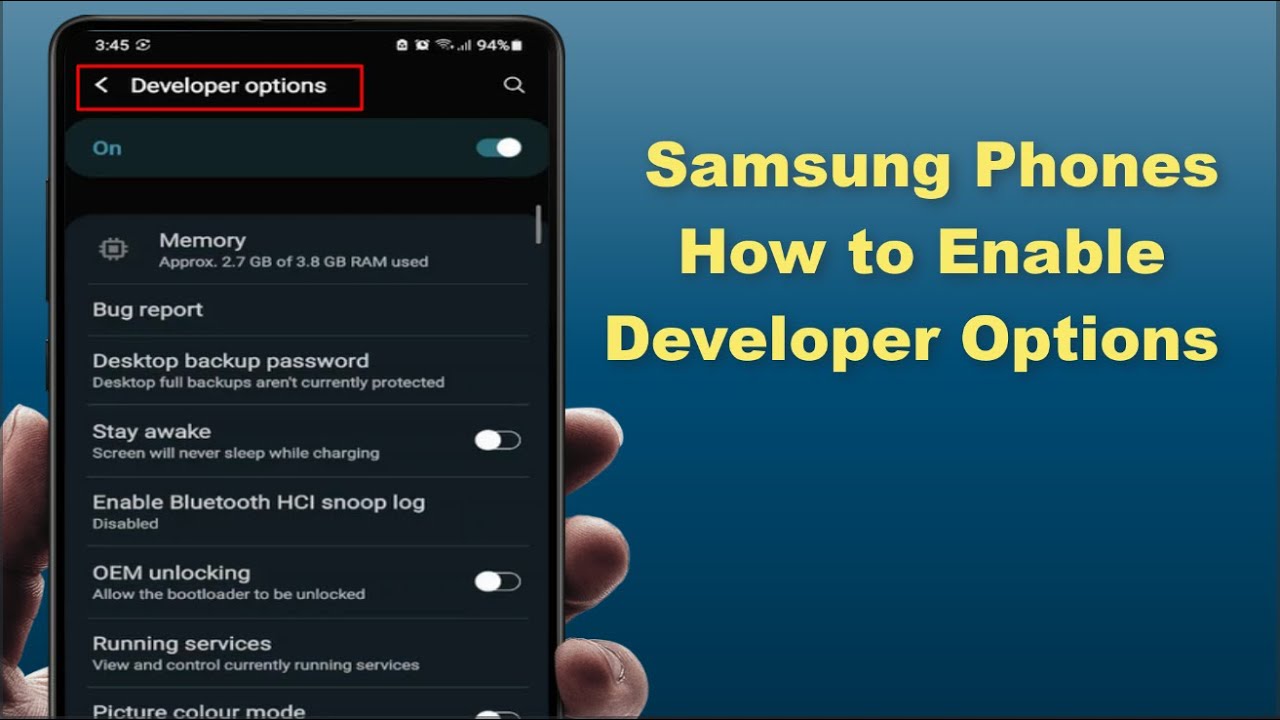
Now, go back to the main Settings menu (you might need to tap the back arrow a couple of times). You will now find a new option, Developer options, usually located just above “About phone” or within a “System” or “General management” submenu, depending on your Android version. Tap on it to explore the various settings.
How to Disable Developer Options
If you no longer need Developer Options or want to revert your phone to its standard configuration, disabling them is even simpler:
- Go to Settings.
- Tap on Developer options.
- At the very top of the Developer Options screen, there will be a toggle switch. Tap it to turn it Off.
Once disabled, the “Developer options” menu will disappear from your main Settings list. All settings you might have changed within Developer Options will revert to their default values.
Troubleshooting: Developer Options Not Showing
If you’ve followed the steps and Developer Options still aren’t appearing, here are a few things to check:
- Did you tap enough times? Ensure you tapped the “Build number” precisely seven times. Sometimes a quick tap isn’t registered, so make sure each tap counts.
- Are you in the right place? Double-check that you’re tapping the “Build number” under “Software information” within “About phone.”
- Restart your phone: A simple reboot can sometimes resolve minor glitches. After restarting, try the steps again.
- Search in Settings: On some newer Samsung devices or Android versions, even if enabled, the Developer Options menu might not appear at the very bottom of the main Settings list. Try using the search bar within the Settings app and type “Developer options” to locate it.
- Recent Updates: Occasionally, a recent software update might subtly change the menu layout. However, the core method of tapping the build number remains largely consistent across Android versions.
Important Considerations
While enabling Developer Options can unlock powerful features, it’s crucial to understand a few things:
- Use with Caution: Many settings within Developer Options can significantly alter your phone’s behavior. Randomly changing settings without understanding their purpose can lead to performance issues, unexpected app behavior, or even data loss.
- Security Risks: Features like USB Debugging and OEM Unlocking inherently increase your device’s vulnerability if misused. Only enable USB Debugging when connected to a trusted computer. OEM Unlocking can compromise your phone’s security and should only be performed if you fully understand the implications.
- Warranty: While enabling Developer Options itself usually doesn’t void your warranty, using some of its more advanced features, especially OEM Unlocking and subsequently rooting your device, most certainly will.
In summary, Developer Options is a valuable tool for those who know how to use it. Approach it with curiosity and caution, and you’ll be able to unlock a new level of control over your Samsung phone.
FAQ (Frequently Asked Questions)
Q1: Is it safe to enable Developer Options on my Samsung phone?
Yes, simply enabling Developer Options is generally safe and won’t harm your phone. The risks arise when you start changing individual settings within the menu without understanding their purpose. It’s designed for developers, so some settings can affect performance or security if misused.
Q2: What is the “Build number” and why do I tap it?
The Build number is a unique identifier for the specific version of the Android software build running on your device. Tapping it seven times is a hidden trick programmed into Android to unlock the Developer Options menu. It’s a way for Google to keep these advanced settings out of reach for casual users while making them accessible to those who know the “secret.”
Q3: Will enabling Developer Options drain my battery faster?
No, simply enabling the Developer Options menu itself does not inherently drain your battery faster. However, some specific settings within Developer Options, if activated (like “Stay awake” or enabling extensive background processes), could impact battery life.
Q4: Can I hide Developer Options again after enabling them?
Yes, you can easily hide Developer Options. Go to Settings > Developer options and toggle the main switch at the top of the screen to “Off.” The menu will then disappear from your settings.
Q5: What is USB Debugging and why is it important?
USB Debugging is a setting within Developer Options that allows your Android device to communicate with a computer using the Android Debug Bridge (ADB). This is crucial for developers to install, debug, and test applications directly on the device. For users, it’s often a prerequisite for advanced tasks like rooting, installing custom ROMs, or using specific PC software that interacts with your phone.
Q6: Can I mess up my phone by changing settings in Developer Options?
Yes, it is possible to cause undesirable behavior or performance issues by changing certain settings in Developer Options without understanding them. For instance, altering animation scales drastically can make your phone feel sluggish or too fast. It’s always recommended to research a setting before changing it, or if unsure, leave it at its default.
Q7: My Developer Options are enabled, but I can’t find them in Settings. What should I do?
If you’ve enabled Developer Options and received the confirmation message but can’t find the menu, try these steps:
- Go back to the main Settings screen. It should appear near the bottom, usually above “About phone.”
- If not, try searching for “Developer options” in the search bar within the Settings app.
- Restart your phone and check again.
Q8: Does enabling Developer Options void my warranty?
Generally, simply enabling Developer Options does not void your warranty. However, using some of the features within it, particularly OEM Unlocking and subsequently rooting your device or flashing custom firmware, will void your warranty and can sometimes lead to security vulnerabilities if not done correctly.