Samsung Galaxy phones, like many modern smartphones, come equipped with hidden diagnostic tools. These tools are invaluable for testing various hardware components, identifying issues, and even verifying the authenticity of certain parts, especially if you’ve purchased a used device. This “secret diagnostic mode” is primarily accessed through a specific dialer code, a method commonly used in Android devices for accessing hidden menus. Understanding how to use this mode can save you time and potential repair costs.
What is Diagnostic Mode?
Diagnostic mode, often referred to as a “service menu” or “test mode,” is a built-in feature that allows users to perform various tests on a phone’s hardware and software components. Think of it as a quality control suite for your device. For Samsung Galaxy phones, this mode enables you to check everything from your screen’s touch sensitivity and color reproduction to the functionality of your sensors, camera, speaker, and even vibration motor. It’s a powerful tool for troubleshooting and verifying your phone’s health.
Historically, these diagnostic modes were primarily used by technicians and manufacturers for quality assurance and repair. However, with the increasing complexity of smartphones and the rise of second-hand markets, these tools have become more accessible and useful for end-users.
Why Would You Use Diagnostic Mode?
There are several compelling reasons to use the diagnostic mode on your Samsung Galaxy phone:
- Troubleshooting Hardware Issues: If you suspect a problem with your screen, camera, speaker, or any other hardware component, this mode allows you to pinpoint the exact issue. For example, if your screen isn’t responding in a specific area, the touch screen test can confirm it.
- Buying a Used Phone: This is arguably one of the most crucial uses. Before purchasing a second-hand Samsung Galaxy, running through these tests can help you verify that all components are functioning correctly. This can prevent you from buying a device with hidden defects.
- Verifying Repairs: If your phone has undergone a repair, you can use the diagnostic mode to confirm that the repaired or replaced parts are working as they should.
- General Health Check: Even without a specific issue, periodically running these tests can give you a good overview of your phone’s overall health.
How to Access the Secret Diagnostic Mode
Accessing the diagnostic mode on most Samsung Galaxy phones is straightforward and involves using a specific dialer code. This method is consistent across many Android devices and is a legacy feature from older phone operating systems.
Step 1: Open the Phone Dialer App Locate and tap on the Phone or Dialer app icon on your Samsung Galaxy’s home screen or app drawer. This is the app you use to make phone calls.
Step 2: Enter the Secret Code Once the dialer app is open, type the following code:
*#0*#
Important Note: You do not need to press the call button after typing the code. The diagnostic menu should appear automatically as soon as you type the final #.
Step 3: Navigate the Diagnostic Menu After entering the code, a new screen will appear. This is the diagnostic menu (also known as the service menu or test mode). You’ll see a grid of various test options, each designed to check a specific component of your phone.
Common Diagnostic Tests and Their Functions
The diagnostic menu typically presents a range of options. Here are some of the most common and useful tests you’ll find:
- Red, Green, Blue (RGB): These tests display a full screen of each primary color. This helps you check for dead pixels, screen uniformity, and color accuracy.
- Receiver: Tests the earpiece speaker, useful for checking call audio.
- Vibration: Activates the vibration motor to ensure it’s functioning properly.
- Dimming: Checks the display’s brightness levels and how it adjusts.
- Mega Cam / Front Cam: Allows you to test the rear and front cameras, including their focus and picture-taking capabilities.
- Sensor: This is a crucial test. It allows you to check various sensors like the accelerometer, gyroscope, proximity sensor, barometer, and light sensor. You can often see real-time data from these sensors. For example, the proximity sensor test will usually show a change when you cover the sensor near the earpiece.
- Touch: This is an interactive test where you draw on the screen to ensure all areas of the touch display are responsive. It’s excellent for identifying “dead spots” on your screen.
- Speaker: Plays a sound through the main loudspeaker to check its functionality.
- Sub Key: Tests the physical buttons on your phone (volume up/down, power button, and sometimes the Bixby button if applicable) to ensure they are responding correctly.
- LED: Checks the functionality of the notification LED, if your phone has one.
- MST Test: (Magnetic Secure Transmission Test) Relevant for some Samsung Pay features, this checks the MST antenna.
- Low Frequency: Tests the phone’s ability to produce low-frequency sounds.
How to Exit Diagnostic Mode: To exit the diagnostic menu, you typically need to press the back button repeatedly until you return to the dialer app, or simply press the home button.
Troubleshooting Tips
- Code Not Working: Ensure you’ve typed the code exactly as *#0*# and haven’t pressed the call button. If it still doesn’t work, ensure your phone is a genuine Samsung Galaxy device. Some carrier-locked phones or custom ROMs might disable this feature.
- Limited Options: The available tests can vary slightly depending on your specific Samsung Galaxy model and the Android version it’s running. Newer phones might have more advanced tests, while older models might have fewer.
- No Damage Caused: Using this diagnostic mode will not harm your phone or alter its settings permanently. It’s a read-only testing environment.
Other Diagnostic Tools and Methods
While the *#0*# code is the primary method for accessing the secret diagnostic mode, there are other ways to check your phone’s health and gather information:
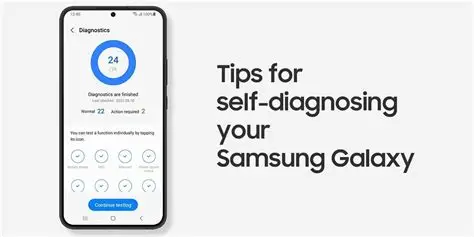
- Samsung Members App: This official Samsung app often includes a “Diagnostics” or “Get Help” section where you can run automated tests on various hardware components. This is a more user-friendly interface compared to the dialer code menu.
- Third-Party Diagnostic Apps: The Google Play Store offers numerous third-party apps that claim to test phone hardware. While some can be useful, exercise caution and only download apps from reputable developers. Always check reviews and permissions before installing.
- Android’s Developer Options: While not a direct diagnostic mode, enabling Developer Options (by tapping the build number seven times in “About Phone” settings) unlocks advanced settings, including USB debugging and performance monitoring tools, which can indirectly help with troubleshooting.
By familiarizing yourself with these diagnostic tools, you empower yourself to better understand and maintain your Samsung Galaxy phone, ensuring its optimal performance and longevity.
FAQ Section
Q1: Is it safe to use the diagnostic mode on my Samsung Galaxy phone?
Yes, it is completely safe. The diagnostic mode is a read-only environment and does not allow you to make changes to your phone’s software or settings that could cause harm. It’s designed for testing purposes.
Q2: Why isn’t the *#0*# code working on my Samsung phone?
There could be a few reasons: 1. Ensure you’ve typed the code correctly and haven’t pressed the call button. 2. Some carrier-locked phones or devices with highly customized Android versions might have this feature disabled by the carrier. 3. It’s possible your device is not a genuine Samsung Galaxy phone or is a very old model where this specific code might not apply.
Q3: Can diagnostic mode fix issues on my phone?
No, diagnostic mode cannot “fix” issues. It is a tool for identifying and diagnosing problems. Once you’ve identified a faulty component using the diagnostic tests, you’ll need to take appropriate action, such as seeking repair or replacing the part.
Q4: Are there other secret codes for Samsung Galaxy phones?
Yes, there are many “secret codes” (also known as MMI codes – Man-Machine Interface codes) for Android phones, including Samsung. These codes can access various hidden menus for network information, battery status, firmware versions, and more. However, the *#0*# code is specifically for hardware diagnostics. Be cautious when using other codes, as some might access sensitive settings.
Q5: What should I do if a test fails in diagnostic mode?
If a specific test fails (e.g., the touch screen test shows unresponsive areas, or a camera test doesn’t work), it indicates a potential hardware issue with that component. * If your phone is under warranty, contact Samsung support or your carrier for repair. * If it’s an older phone, consider professional repair or replacement of the device. * If you’re buying a used phone, a failed test is a strong red flag to avoid that particular device.