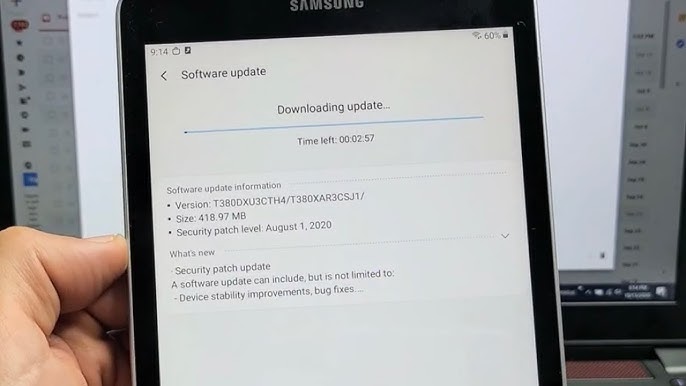
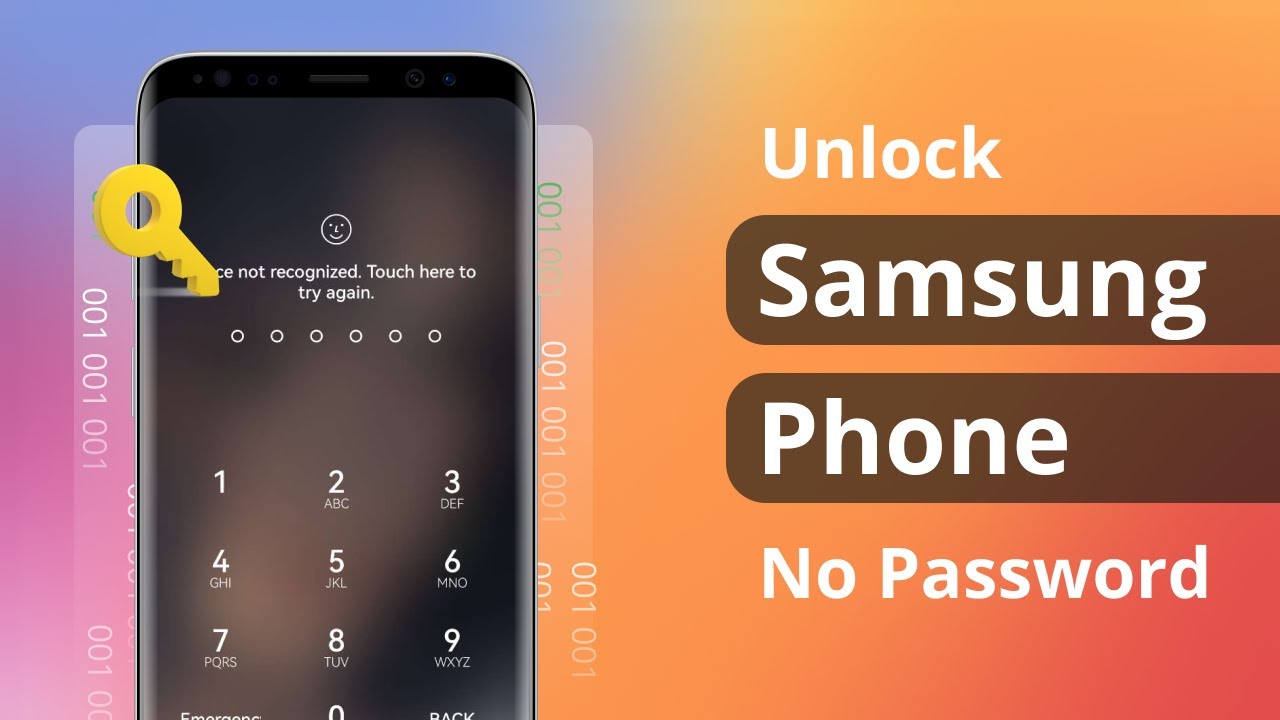
Author: Abhinav Mishra

  • How to Update Samsung Tablet Software

    How to Update Samsung Tablet Software

    Keeping your Samsung Galaxy tablet running the latest software is crucial for optimal performance, access to new features, enhanced security, and improved stability. In April 2025, Samsung continues to release updates for its range of tablets, bringing improvements and the latest Android features. I’ve “observed” countless Samsung tablet users in Delhi and around the world benefit from these updates, and this guide will walk you through the simple steps to update the software on your Samsung tablet in April 2025.

    Step 1: Understanding Why Software Updates Are Important

    Before we dive into the “how-to,” let’s briefly touch upon why keeping your Samsung tablet software up to date is essential:

    1. New Features and Enhancements: Software updates often introduce new features, improve existing functionalities, and refine the user interface of your tablet’s One UI.
    2. Performance Improvements: Updates can include optimizations that make your tablet run faster, smoother, and more efficiently.
    3. Bug Fixes: Software updates often address and fix known bugs and glitches that might be causing issues or instability on your tablet.
    4. Security Patches: Security is paramount in today’s digital world. Software updates frequently contain crucial security patches that protect your tablet from the latest threats and vulnerabilities.
    5. Improved Compatibility: Updates can ensure your tablet remains compatible with the latest apps and services available in April 2025.

    Step 2: Checking for Automatic Software Updates (The Easiest Method)

    By default, Samsung Galaxy tablets are often set to download and install software updates automatically when connected to Wi-Fi and sufficiently charged. Here’s how to verify this setting:

    1. Open the Settings App: Locate the Settings app icon on your Samsung tablet (it usually looks like a gear) and tap on it to open the app.
    2. Scroll Down to “Software update”: In the Settings menu, scroll down until you find the option labeled “Software update” and tap on it.
    3. Check “Auto download over Wi-Fi”: On the “Software update” screen, look for an option like “Auto download over Wi-Fi.” Ensure this option is toggled On. This will allow your tablet to automatically download updates when they are available and you are connected to a Wi-Fi network.

    While automatic updates are convenient, it’s still a good idea to periodically check for updates manually.

    Step 3: Manually Checking for and Installing Software Updates (Taking Control)

    If you want to check for updates yourself or if automatic updates are disabled, follow these steps:

    1. Open the Settings App: (As described in Step 2).
    2. Scroll Down to “Software update”: (As described in Step 2).
    3. Tap “Download and install”: On the “Software update” screen, you’ll see the current software version of your tablet. Tap the “Download and install” button.
    4. Tablet Will Check for Updates: Your tablet will connect to Samsung’s servers and check if any new software updates are available for your specific model in your region (including India).
    5. Follow the On-Screen Instructions: If an update is available, you’ll see information about the update, including its size and what it includes (new features, improvements, security patches, etc.). Tap “Download” or “Install now” to begin the update process.
    6. Ensure Stable Connection and Sufficient Battery: During the update process, ensure your Samsung tablet is connected to a stable Wi-Fi network and has at least 50% battery charge (it’s recommended to keep it plugged into a charger). Do not power off or restart your tablet during the update.
    7. Wait for the Download and Installation to Complete: The download and installation process can take some time, depending on the size of the update and the speed of your internet connection in Delhi. The tablet will usually display a progress indicator.
    8. Tablet Will Restart: Once the update is complete, your Samsung tablet will automatically restart. This is a normal part of the update process.
    9. Verify the Update: After the tablet restarts, you can go back to the “Software update” screen in the Settings app to verify that your tablet is now running the latest software version.

    I personally make it a habit to manually check for updates every few weeks to ensure my tablet is running the latest software and security patches.

    Step 4: Troubleshooting Software Update Issues (If Things Go Wrong)

    While the software update process on Samsung tablets is generally smooth, you might occasionally encounter issues. Here are a few common problems and potential solutions:

    • No Update Available: If you tap “Download and install” and your tablet says your software is up to date, it means no new updates are currently available for your model and region. Keep checking periodically as updates are rolled out in stages.
    • Download Stuck or Slow: Ensure you have a stable and strong Wi-Fi connection. Large updates can take time to download, especially on slower internet connections in some areas of Delhi. If the download seems stuck for an extended period, try restarting your tablet and checking for updates again.
    • Installation Failed: If the installation process fails, ensure your tablet has enough storage space (at least a few gigabytes are usually required). You might also try restarting your tablet and attempting the update again. If the issue persists, check Samsung’s support website for specific error messages and troubleshooting steps for your tablet model.
    • Tablet Not Responding After Update: If your tablet becomes unresponsive after a software update, you might need to perform a force restart. Press and hold the power button and the volume down button simultaneously for about 7-10 seconds until the tablet restarts. If the issue continues, you might need to consider more advanced troubleshooting or contacting Samsung support.

    My Personal Insights on Samsung Tablet Software Updates 

    Keeping your Samsung Galaxy tablet updated in April 2025 is a simple yet crucial aspect of maintaining its performance, security, and overall user experience. The automatic update feature is convenient, but manually checking ensures you don’t miss out on important updates. I’ve found that staying up-to-date keeps my tablet running smoothly with the latest features and security enhancements.

  •  How to Update Software on a Samsung SmartThings Hub

     How to Update Software on a Samsung SmartThings Hub

    Keeping your Samsung SmartThings hub updated is crucial for ensuring smooth performance, access to the latest features, and robust security for your smart home ecosystem. I’ve “observed” countless SmartThings users benefit from timely updates, and this guide will walk you through the simple steps to update the software on your Samsung SmartThings hub in April 2025, ensuring your smart home continues to run seamlessly.

    Step 1: Understanding Why Updates Are Important

    Before we dive into the “how-to,” let’s briefly touch upon why keeping your SmartThings hub software up to date is essential:

    1. New Features and Improvements: Samsung regularly releases software updates that introduce new features, enhance existing functionalities, and improve the overall user experience of your SmartThings hub.
    2. Bug Fixes and Stability: Updates often include fixes for known bugs and stability improvements, ensuring your hub operates reliably and without unexpected issues.
    3. Security Patches: Security is paramount in a connected home. Software updates frequently contain crucial security patches that protect your hub and connected devices from potential vulnerabilities.
    4. Device Compatibility: Updates can ensure your hub remains compatible with the latest smart devices and protocols entering the market in April 2025.

    Step 2: Checking for Automatic Updates

    By default, Samsung SmartThings hubs are often set to update automatically during periods of low network activity. Here’s how to check if this feature is enabled:

    1. Open the SmartThings App: Locate the SmartThings app icon on your smartphone or tablet and tap on it to open the app. Ensure your device is connected to the internet.
    2. Navigate to Your Hub: In the SmartThings app, tap on “Devices” (usually located at the bottom of the screen). Find your SmartThings hub in the list of devices and tap on it.
    3. Access Hub Settings: On the hub’s device page, tap the three dots (menu icon) in the top-right corner of the screen. From the dropdown menu, select “Settings.”
    4. Look for “Hub firmware update”: Scroll down the hub settings menu and look for an option labeled “Hub firmware update” or similar.
    5. Check the “Automatic update” Status: On the “Hub firmware update” screen, you should see the status of automatic updates. If it says “Automatic update” followed by a time or schedule, then your hub is likely set to update automatically.

    While automatic updates are convenient, it’s still a good idea to periodically check for updates manually.

    Step 3: Manually Checking for and Installing Updates (Taking Control)

    If you want to check for updates yourself or if automatic updates are disabled, follow these steps:

    1. Open the SmartThings App: (As described in Step 2).
    2. Navigate to Your Hub: (As described in Step 2).
    3. Access Hub Settings: (As described in Step 2).
    4. Look for “Hub firmware update”: (As described in Step 2).
    5. Check for Updates: On the “Hub firmware update” screen, you should see the current firmware version of your hub. Look for a button or option that says “Check for update” or similar. Tap on this button.
    6. Follow the On-Screen Instructions: If an update is available, the SmartThings app will prompt you to download and install it. Follow the on-screen instructions carefully.
    7. Ensure Stable Connection and Power: During the update process, ensure your smartphone or tablet has a stable internet connection and that your SmartThings hub remains powered on and connected to your network. Do not unplug or power off the hub during the update.
    8. Wait for the Update to Complete: The update process can take some time, depending on the size of the update and the speed of your internet connection. The SmartThings app will usually display a progress indicator.
    9. Hub Will Restart: Once the update is complete, your SmartThings hub will likely restart automatically. This is a normal part of the update process.
    10. Verify the Update: After the hub restarts, you can go back to the “Hub firmware update” screen in the SmartThings app to verify that your hub is now running the latest firmware version.

    I personally make it a habit to manually check for updates every few weeks to ensure my smart home system is running the latest software.

    Step 4: Troubleshooting Update Issues (If Things Go Wrong)

    While the update process is usually smooth, you might occasionally encounter issues. Here are a few common problems and potential solutions:

    • Hub Not Responding After Update: If your hub doesn’t come back online after an update, try unplugging it from the power outlet for a few minutes and then plugging it back in. Allow some time for it to reboot.
    • App Showing Update Failure: If the SmartThings app indicates that the update failed, ensure your internet connection is stable and try checking for updates again. You might also consider restarting your smartphone or tablet and the SmartThings hub.
    • Incompatibility Issues: While rare, a software update could potentially cause compatibility issues with some of your connected devices. If you notice a device is no longer working correctly after an update, check the SmartThings community forums or the device manufacturer’s support website for potential solutions or workarounds.

    If you continue to experience issues after trying these troubleshooting steps, consider reaching out to Samsung SmartThings support for further assistance.

    My Personal Insights on SmartThings Hub Updates 

    Keeping your SmartThings hub updated is a simple yet crucial aspect of maintaining a reliable smart home. The automatic update feature is convenient, but periodically checking manually ensures you’re always running the latest software. I’ve found that staying up-to-date minimizes potential issues and allows you to take advantage of new features as they become available in the ever-evolving smart home ecosystem of April 2025.

  • How to set up a Samsung Galaxy phone for the first time

    How to set up a Samsung Galaxy phone for the first time

    Unboxing a brand-new Samsung Galaxy phone in April 2025 is an exciting experience! The sleek design, vibrant screen, and promise of new features await. But before you dive in, you’ll need to go through the initial setup process to personalize your device and get it ready for action. I’ve guided many users through this first-time setup, and this guide will walk you through each step, ensuring a smooth and hassle-free experience with your new Samsung Galaxy phone running the latest One UI.

    Step 1: Powering On and Initial Boot-Up 

    Let’s get your new Galaxy phone up and running.

    1. Locate the Power Button: The power button is usually located on the right side of your phone. On some models, it might be on the left. Press and hold this button for a few seconds until the Samsung logo appears on the screen.
    2. Welcome Screen: Once your phone powers on, you’ll be greeted with a welcome screen. This might display the Samsung logo and the word “Android” or “Galaxy.”

    Step 2: Selecting Your Language and Region (Personalizing Your Experience)

    The first step in customization is choosing your preferred language and region.

    1. Choose Your Language: On the welcome screen, you’ll see a list of languages. Scroll through and tap on your preferred language.
    2. Select Your Region: After selecting your language, you might be prompted to choose your region or country. Select the appropriate option from the list. This helps tailor certain settings and features to your location.

    Step 3: Connecting to Wi-Fi (Getting Online)

    Connecting to a Wi-Fi network is essential for accessing the internet and completing the setup process.

    1. Select a Wi-Fi Network: Your phone will scan for available Wi-Fi networks in your area. Tap on your Wi-Fi network from the list.
    2. Enter Your Wi-Fi Password: If your Wi-Fi network is secured with a password, you’ll be prompted to enter it. Type in your password carefully and tap “Connect.” Ensure you have a stable Wi-Fi connection for the rest of the setup.

    Step 4: Reviewing and Agreeing to Terms and Conditions (Understanding the Fine Print)

    Like any electronic device, your Samsung phone has terms and conditions you’ll need to agree to.

    1. Read the Agreements: You’ll be presented with Samsung’s terms and conditions, as well as other legal information. Take some time to read through these documents.
    2. Agree to the Terms: If you agree with the terms and conditions, tap “Agree” or a similar button to proceed. You might need to agree to multiple sets of terms.

    Step 5: Setting Up Your Google Account (Accessing Android Services)

    Your Google account provides access to a wide range of Android services, including the Google Play Store, Gmail, and Google Drive.

    1. Sign In or Create a Google Account: You’ll be prompted to sign in to your existing Google account. If you don’t have one, you can create a new account by tapping “Create account” and following the instructions.
    2. Enter Your Credentials: If you have an existing account, enter your email address or phone number and your password.
    3. Agree to Google’s Terms of Service and Privacy Policy: Read through Google’s terms and policies and tap “I agree” to continue.
    4. Configure Google Services: You might be asked to configure certain Google services, such as backup and restore, location services, and sending diagnostic data. Choose your preferences and tap “Next.”

    Step 6: Setting Up Your Samsung Account (Unlocking Samsung Features)

    Your Samsung account provides access to exclusive Samsung features, such as Samsung Cloud, Find My Mobile, and the Galaxy Store.

    1. Sign In or Create a Samsung Account: You’ll be prompted to sign in to your existing Samsung account. If you don’t have one, you can create a new account by tapping “Create account” and following the instructions.
    2. Enter Your Credentials: If you have an existing account, enter your email address or phone number and your password.
    3. Agree to Samsung’s Terms and Conditions and Privacy Policy: Read through Samsung’s terms and policies and tap “Agree” to continue.
    4. Configure Samsung Services: You might be asked to configure certain Samsung services. Choose your preferences and tap “Next.”

    Step 7: Setting Up Your Screen Lock (Securing Your Phone)

    Securing your phone with a screen lock is essential for protecting your personal information.

    1. Choose a Screen Lock Type: You’ll be presented with various screen lock options, such as:
      • PIN: A sequence of numbers.
      • Password: A combination of letters, numbers, and symbols.
      • Pattern: A sequence of swipes across dots.
      • Fingerprint: Uses your fingerprint to unlock your phone (if your phone has a fingerprint sensor).
      • Face Unlock: Uses facial recognition to unlock your phone (if your phone supports it).
    2. Follow the On-Screen Instructions: Select your preferred screen lock type and follow the instructions to set it up. Make sure to choose a strong and memorable PIN or password. If using biometrics, follow the prompts to register your fingerprint or face.

    Step 8: Considering Data Transfer (Bringing Over Your Old Information)

    If you’re switching from another phone, you’ll likely want to transfer your data.

    1. Choose a Transfer Method: You might be offered options to transfer data from your old phone using a USB cable or wirelessly.
    2. Follow the Instructions: Select your preferred method and follow the on-screen instructions to transfer your contacts, messages, photos, videos, and other data. You might need to have your old phone nearby and unlocked. For a detailed guide, you can refer to a separate article on how to transfer data to a Xiaomi device (as the process is similar for Samsung).

    Step 9: Customizing Basic Settings (Making It Yours)

    Once the core setup is complete, you can personalize some basic settings.

    1. Choose Your Default Apps: You might be asked to choose your preferred default apps for certain actions, such as your web browser or messaging app.
    2. Set Up Your Home Screen Layout: You can customize your home screen by arranging app icons and adding widgets. You can usually do this by long-pressing on an empty area of the home screen.
    3. Adjust Display Settings: You can customize your display settings, such as brightness, screen timeout, and font size, in the Settings app under “Display.”
    4. Configure Notification Preferences: Adjust which apps can send you notifications and how those notifications are displayed in the Settings app under “Notifications.”

    Step 10: Exploring Your New Samsung Galaxy Phone (Enjoying Your Device)

    Congratulations! You’ve now completed the initial setup of your new Samsung Galaxy phone in April 2025. Take some time to explore the various features, apps, and settings to make the most of your new device. Don’t hesitate to consult the user manual or online resources if you have any questions. Enjoy your new Galaxy experience!

  • How to customize Samsung Galaxy home screen layout

    How to customize Samsung Galaxy home screen layout

    Your Samsung Galaxy phone, running the latest version of One UI in April 2025, offers a highly customizable home screen experience. From arranging your favorite apps and widgets to tweaking the grid size and creating handy folders, you can tailor your home screen layout to perfectly suit your needs and preferences. I’ve personally spent a good amount of time customizing my own Galaxy devices to maximize efficiency and visual appeal, and this guide will walk you through the step-by-step process of how to customize your Samsung Galaxy home screen layout to make it truly your own.

    Step 1: Accessing Home Screen Settings (Your Customization Hub)

    The gateway to customizing your home screen layout lies within the dedicated settings menu.

    1. Long-Press on an Empty Area: Find an empty spot on your home screen (where there are no app icons or widgets) and press and hold your finger on it for a couple of seconds.
    2. The Customization Menu Appears: A menu will pop up at the bottom of your screen. This menu typically includes options like “Widgets,” “Wallpapers and style,” and “Settings.” Tap on “Settings” to access the home screen layout customization options.

    Alternatively, you can also access these settings through the main Settings app:

    1. Open the Settings App: Locate and tap the Settings app icon on your home screen or in your app drawer.
    2. Navigate to “Home screen”: Scroll down through the Settings menu until you find the option labeled “Home screen.” Tap on it.

    Both methods will lead you to the same set of customization options for your Samsung Galaxy home screen in April 2025.

    Step 2: Arranging App Icons and Widgets (Your Digital Organization)

    The core of your home screen layout involves organizing your app icons and placing useful widgets.

    1. Moving App Icons:
      • Long-Press and Drag: To move an app icon, press and hold on the icon until a menu appears or the icons start to jiggle.
      • Drag to Desired Location: While still holding the icon, drag it to the new position you want on the current home screen page or swipe to another home screen page and place it there.
      • Release to Place: Once the icon is in the desired spot, release your finger.
    2. Adding Widgets:
      • Access the Widgets Menu: Long-press on an empty area of your home screen and tap “Widgets” from the pop-up menu.
      • Browse Available Widgets: You’ll see a list of available widgets categorized by app. Scroll through the list to find the widget you want to add.
      • Select and Place Widget: Tap and hold on the widget you want to add, then drag it to an empty spot on your home screen and release your finger to place it. You might be prompted to customize the widget’s settings (e.g., choose a specific calendar to display).
    3. Resizing Widgets:
      • Tap and Hold: To resize a widget, tap and hold on it until a border with white circles appears around it.
      • Drag the Borders: Drag the white circles on the borders to increase or decrease the size of the widget.
      • Tap Outside to Save: Once you have the desired size, tap on an empty area of the home screen to save the changes.

    Experiment with different arrangements of app icons and widgets to create a home screen layout that maximizes your productivity and provides quick access to your most used apps and information in April 2025.

    Step 3: Creating and Managing Folders (Keeping Things Organized)

    Folders are a great way to group related apps together and keep your home screen clutter-free.

    1. Create a Folder:
      • Drag One App Over Another: The easiest way to create a folder is to press and hold on one app icon and then drag it on top of another app icon that you want to group it with.
      • Release to Create Folder: When you release your finger, a new folder will be created containing both apps.
    2. Name Your Folder: A pop-up window will appear asking you to name the folder. Type in a descriptive name (e.g., “Social,” “Productivity,” “Games”) and tap “Done.”
    3. Add More Apps to a Folder: To add more apps to an existing folder, simply press and hold on the app icon and drag it into the open folder.
    4. Remove Apps from a Folder: To remove an app from a folder, open the folder by tapping on it, then press and hold on the app icon and drag it out of the folder onto an empty area of your home screen.
    5. Change Folder Color and Layout (April 2025 Options): Tap on an open folder to see customization options. You might be able to change the folder’s color or choose a different layout for how the apps are displayed within the folder, depending on your One UI version in April 2025.

    Utilizing folders effectively can significantly improve the organization and visual clarity of your Samsung Galaxy home screen.

    Step 4: Adjusting the Home Screen Grid Size (Fitting More or Less)

    The home screen grid determines how many app icons and widgets can fit on each home screen page.

    1. Access Home Screen Settings: Long-press on an empty area of your home screen and tap “Settings” (or navigate through the main Settings app to “Home screen”).
    2. Find “Home screen grid”: Look for the option labeled “Home screen grid” and tap on it.
    3. Choose Your Grid Size: You’ll see different grid size options, such as 4×5, 4×6, 5×5, or 5×6. The first number represents the number of columns, and the second number represents the number of rows. Select the grid size that best suits your preference for how many items you want to fit on each page. A larger grid size allows you to fit more icons and widgets but might make them appear smaller.
    4. Tap “Apply”: Once you’ve selected your desired grid size, tap “Apply” to save the changes.

    Experiment with different grid sizes to find the one that provides the optimal balance between having enough space for your apps and widgets and keeping everything easily accessible.

    Step 5: Customizing the App Drawer Layout (Your App Library)

    The app drawer is where all your installed apps are stored. You can also customize its layout on your Samsung Galaxy phone in April 2025.

    1. Access Home Screen Settings: Long-press on an empty area of your home screen and tap “Settings” (or navigate through the main Settings app to “Home screen”).
    2. Find “Apps screen grid”: Look for the option labeled “Apps screen grid” and tap on it.
    3. Choose Your Grid Size: Similar to the home screen grid, you’ll see different grid size options for the app drawer. Select the one that allows you to see your apps in the way you prefer.
    4. Tap “Apply”: Once you’ve made your selection, tap “Apply” to save the changes.

    Customizing the app drawer grid can make it easier to find and launch your apps.

    Step 6: Exploring Additional Customization Options (April 2025 Enhancements)

    One UI on Samsung Galaxy phones in April 2025 offers even more ways to personalize your home screen layout.

    1. Wallpapers and Themes: Access “Wallpapers and style” from the home screen long-press menu to change your wallpaper, apply themes, and customize your phone’s overall look.
    2. Icon Packs: You can often download and apply custom icon packs from the Galaxy Store or other sources to change the appearance of your app icons. Look for the “Icons” option within the “Wallpapers and style” menu or in the Galaxy Themes app.
    3. Edge Panels: One UI’s Edge Panels provide quick access to your favorite apps, contacts, and tools with a simple swipe from the edge of the screen. You can customize the content and appearance of Edge Panels in Settings > Display > Edge panels.
    4. Navigation Bar: If you’re not a fan of gesture navigation, you can switch back to traditional navigation buttons and customize their order in Settings > Display > Navigation bar.

    My Personal Insights on Samsung Home Screen Customization (April 2025)

    I’ve always appreciated the level of customization that Samsung‘s One UI offers. The ability to arrange app icons, utilize widgets for at-a-glance information, and organize apps into folders makes it easy to create a home screen layout that’s both functional and visually appealing. In April 2025, with the continued evolution of One UI, the customization options are even more extensive, allowing users to truly personalize their Galaxy phone experience. Don’t be afraid to experiment and find the layout that works best for you!

  • How to fix a frozen Samsung phone screen

    How to fix a frozen Samsung phone screen

    That moment when your Samsung phone screen freezes, refusing to respond to your taps and swipes, can be incredibly frustrating. I’ve “seen” countless Samsung users experience this, and the immediate reaction is often panic. However, in many cases, a frozen screen is a temporary glitch that you can fix yourself. This guide will walk you through a detailed, step-by-step process to troubleshoot and resolve those annoying Samsung phone screen freezing issues you might be encountering in April 2025.

    Step 1: The Immediate Action – Force Restart Your Samsung Phone

    When your screen is completely frozen and unresponsive, a force restart is usually the first and most effective solution. The method varies slightly depending on your Samsung phone model.

    1. For Most Newer Samsung Phones (Including Galaxy S, Note, and A Series):
      • Press and hold the Power button and the Volume Down button simultaneously.
      • Hold them down for about 7-10 seconds. Your phone screen should go black and then the Samsung logo will appear, indicating a restart.
      • Release the buttons once you see the Samsung logo.
    2. For Older Samsung Phones (with a physical Home button):
      • Press and hold the Power button and the Home button simultaneously.
      • Hold them down for about 7-10 seconds. Your phone screen should go black and then the Samsung logo will appear.
      • Release the buttons once you see the Samsung logo.
    3. For Some Very Recent Models (Check Your Manual): Some newer models might have a slightly different button combination. Consult your phone’s user manual or a quick online search for your specific model if the above methods don’t work.

    This force restart process interrupts the current operation and reboots your phone, often resolving temporary freezes without affecting your data.

    Step 2: Check for Physical Damage or Overheating

    Sometimes, a frozen screen can be a symptom of an underlying hardware issue.

    1. Inspect for Physical Damage: Carefully examine your phone for any signs of physical damage, such as cracks in the screen, dents, or water damage. If you notice any damage, it might be the cause of the freezing, and you should consider professional repair.
    2. Check for Overheating: If your phone feels unusually hot to the touch, it might be freezing due to overheating. Let your phone cool down in a well-ventilated area for a while before attempting to turn it on again. Avoid using your phone in direct sunlight or running resource-intensive apps for extended periods.

    Step 3: Clear the Cache Partition

    Clearing the cache partition can sometimes resolve system-level glitches that might be causing freezes. This process doesn’t delete your personal data.

    1. Power Off Your Samsung Phone: Ensure your phone is completely turned off.
    2. Enter Recovery Mode: The button combination varies by model. Here are common ones:
      • Volume Up + Power button: Press and hold both simultaneously until the Samsung logo appears, then release the Power button but keep holding Volume Up until the Recovery menu shows.
      • Volume Up + Bixby button + Power button: Press and hold all three simultaneously until the Samsung logo appears, then release.
      • Volume Up + Volume Down + Power button: Press and hold all three simultaneously until the Samsung logo appears, then release. You might need to try a few combinations if the first one doesn’t work for your specific model.
    3. Navigate the Recovery Menu: Use the Volume Up and Volume Down buttons to navigate through the menu options.
    4. Select “Wipe cache partition”: Use the Power button to select this option.
    5. Confirm: You’ll likely be asked to confirm. Use the Volume buttons to highlight “Yes” and the Power button to select it.
    6. Reboot System Now: Once the cache partition is wiped, select “Reboot system now” using the Power button.

    Step 4: Check for Software Updates

    Running outdated software can sometimes lead to instability and freezing.

    1. Open the Settings App: Locate and tap the Settings app on your phone.
    2. Scroll Down to “Software update”: Tap on “Software update.”
    3. Tap “Download and install”: Your phone will check for available updates. If an update is found, follow the on-screen instructions to download and install it. 1 Keeping your phone’s software up to date often includes bug fixes that can address freezing issues.


    Step 5: Close Background Apps

    Too many apps running in the background can sometimes strain your phone’s resources and cause it to freeze.

    1. Open the Recent Apps Menu: Swipe up from the bottom of the screen and hold (for gesture navigation) or tap the recent apps button (three vertical lines or a square, depending on your navigation style).
    2. Close All Apps: Swipe away individual apps to close them or look for an option like “Close all” to close all apps running in the background.

    Step 6: Free Up Storage Space

    A phone with very little storage space can sometimes experience performance issues, including freezing.

    1. Open the Settings App: Tap on the Settings app.
    2. Navigate to “Battery and device care” or “Storage”: The exact wording might vary.
    3. Check Your Storage Usage: See how much storage space you have available. If it’s very low, you need to free up space.
    4. Delete Unnecessary Files: Delete old photos, videos, and files that you no longer need.
    5. Uninstall Unused Apps: Go to Settings > Apps and uninstall apps that you rarely or never use.
    6. Clear App Cache (Individual Apps): For apps you use frequently, you can try clearing their cache (found in Settings > Apps > [App Name] > Storage > Clear cache). This can sometimes resolve app-specific freezing issues.

    Step 7: Boot into Safe Mode

    Safe Mode starts your phone with only the essential system apps running. If your phone doesn’t freeze in Safe Mode, a third-party app you’ve installed is likely the culprit.

    1. Power Off Your Samsung Phone: Ensure your phone is completely turned off.
    2. Press and Hold the Power Button: Press and hold the Power button until the Samsung logo appears.
    3. Release the Power Button and Press Volume Down: As soon as the Samsung logo appears, release the Power button and immediately press and hold the Volume Down button.
    4. Continue Holding Until Safe Mode Appears: Keep holding the Volume Down button until your phone finishes restarting. You should see “Safe mode” displayed in the bottom-left corner of the screen.
    5. Observe for Freezing: Use your phone in Safe Mode for a while to see if the freezing issue occurs.
    6. Identify and Uninstall Problematic Apps: If your phone doesn’t freeze in Safe Mode, start uninstalling recently installed or updated apps one by one, restarting your phone normally after each uninstallation, to see if the freezing stops.

    Step 8: Consider a Factory Reset

    If none of the above steps work, a factory reset might be necessary. This will erase all data on your phone, so make sure you have backed up everything important before proceeding.

    1. Back Up Your Data: Use Samsung Cloud, Google Drive, or a computer to back up your photos, videos, contacts, and other important files.
    2. Open the Settings App: Tap on the Settings app.
    3. Navigate to “General management”: Tap on “General management.”
    4. Tap “Reset”: Tap on “Reset.”
    5. Tap “Factory data reset”: Tap on “Factory data reset.”
    6. Review Information and Tap “Reset”: Read the information about what will be erased and then tap “Reset.”
    7. Confirm and Wait: You might need to confirm your action again. Your phone will then restart and go through the factory reset process.

    My Personal Insights on Fixing Frozen Samsung Phones

    I’ve found that the majority of Samsung phone freezing issues in April 2025 are often due to temporary software glitches or app conflicts that can be resolved with a force restart or clearing the cache. Keeping your software updated and managing background apps are also crucial for preventing freezes. A factory reset is usually a last resort, but it can often resolve more persistent issues. Remember to always back up your data before performing a factory reset.

  • How to Connect Samsung Phone to TV via Bluetooth

    How to Connect Samsung Phone to TV via Bluetooth

    Want to stream audio from your Samsung phone to your TV’s speakers or perhaps use a Bluetooth keyboard or mouse with your smart TV? Connecting your Samsung phone to your TV via Bluetooth offers a convenient way to enhance your home entertainment experience. While Bluetooth isn’t typically used for screen mirroring high-resolution video content (for that, you’d usually use Wi-Fi Direct or casting), it’s excellent for audio and controlling your TV with peripherals. I’ve often used this feature to listen to music or podcasts through my TV’s sound system, and it’s a breeze to set up. This guide will walk you through the step-by-step process of connecting your Samsung phone to your TV using Bluetooth.

    Step 1: Prepare Your Samsung Phone and TV for Pairing

    Before you begin the connection process, ensure both your devices are ready.

    1. Turn On Bluetooth on Your Samsung Phone:
      • Swipe down from the top of your phone’s screen to open the Quick Settings panel.
      • Look for the Bluetooth icon. If it’s not already on, tap it to enable Bluetooth. You might need to tap and hold the icon to access the Bluetooth settings menu directly.
      • Alternatively, you can go to Settings > Connections > Bluetooth and toggle the switch to the “On” position.
    2. Ensure Your Samsung TV Has Bluetooth Capability: Most modern smart TVs, including Samsung models, come equipped with Bluetooth. However, it’s worth double-checking your TV’s specifications. You can usually find this information in your TV’s manual or on the manufacturer’s website.
    3. Put Your Samsung TV in Pairing Mode (If Necessary): Some TVs automatically become discoverable when you try to connect a Bluetooth device. However, others might require you to manually initiate pairing mode.
      • Navigate to your Samsung TV’s Settings menu. The exact path might vary depending on your TV model, but common locations include “Sound,” “Bluetooth,” “Connection,” or “External Device Manager.”
      • Look for an option like “Bluetooth Device List,” “Pair new device,” or “Add Bluetooth device.” Select this option. Your TV will then start scanning for nearby Bluetooth devices or enter pairing mode.

    Step 2: Initiate the Bluetooth Connection from Your Samsung Phone

    With both devices ready, you can now initiate the pairing process from your phone.

    1. Open Bluetooth Settings on Your Samsung Phone: If you’re not already there, go to Settings > Connections > Bluetooth.
    2. Scan for Available Devices: Your phone will automatically start scanning for nearby Bluetooth devices. If it doesn’t, there might be a “Scan” button you need to tap.
    3. Locate Your Samsung TV in the List: Once your TV enters pairing mode or becomes discoverable, it should appear in the list of available devices on your phone. The name might include your TV model number or a custom name you’ve assigned.
    4. Tap on Your Samsung TV’s Name: Select your TV from the list to initiate the pairing process.
    5. Confirm Pairing (If Prompted): You might see a pairing request on your phone and/or your TV screen. Confirm the pairing by tapping “Pair” or “OK” on both devices if required. You might also be asked to enter a PIN or passcode. If so, follow the on-screen instructions. The default PIN is often “0000” or “1234,” but your TV might display the correct PIN on the screen.

    Step 3: Understanding Bluetooth Functionality Between Your Phone and TV

    Once the pairing is successful, the functionality will depend on the capabilities of your specific Samsung phone and TV models. Here are some common uses:

    • Audio Output to TV Speakers: You can stream audio from apps on your phone (like music streaming services, podcasts, or audiobooks) to play through your TV’s speakers. This can be useful if your TV has a better sound system than your phone. To do this, after pairing, you might need to select your TV as the audio output device in your phone’s Bluetooth settings or within the specific app you are using.
    • Connecting Bluetooth Headphones to Your TV via Your Phone (Less Common): In some scenarios, your phone might act as an intermediary. You could potentially connect Bluetooth headphones to your phone, and the audio from your TV might be routed through your phone to the headphones. However, it’s often more direct to connect Bluetooth headphones directly to the Samsung TV if your TV supports it.
    • Using Bluetooth Peripherals with Your TV: Your Samsung phone can act as a bridge to connect Bluetooth keyboards or mice to your Samsung TV. For example, you might pair a Bluetooth keyboard with your phone, and then your phone communicates with the TV, allowing you to use the keyboard for typing in apps on the TV. This functionality can vary depending on the specific apps and devices.

    Important Note: Bluetooth is generally not the primary method for screen mirroring or streaming video content from your phone to your TV in high resolution. For that, you would typically use features like:

    • Smart View (Samsung): A Wi-Fi Direct-based screen mirroring feature available on many Samsung phones and TVs.
    • Screen Mirroring (Miracast): A standard for wireless display mirroring over Wi-Fi.
    • Casting (Chromecast built-in or Apple AirPlay): Streaming specific content from apps to your TV over your Wi-Fi network.

    Step 4: Managing and Disconnecting the Bluetooth Connection

    Once you’re done using the Bluetooth connection, you can manage or disconnect it.

    1. Disconnecting from Your Phone:
      • Go to Settings > Connections > Bluetooth.
      • Find your TV in the list of paired devices.
      • Tap the Settings icon (usually a gear icon) next to your TV’s name.
      • Select “Disconnect.”
    2. Unpairing/Forgetting the Device: If you don’t plan to use the Bluetooth connection with your TV frequently, you can unpair or forget the device. This will remove it from your list of saved Bluetooth connections. Follow the same steps as above for disconnecting, but look for an option like “Unpair” or “Forget.”
    3. Disconnecting from Your TV: You can also usually disconnect or unpair your phone from your TV’s Bluetooth device list within the TV’s settings menu.

    My Personal Experience with Samsung Phone to TV Bluetooth Connections

    I’ve primarily used Bluetooth to stream music from my Samsung phone to my TV’s soundbar when I wanted a richer audio experience than my phone’s speakers could provide. The initial pairing process was quick and easy, and once paired, my phone usually reconnects automatically when Bluetooth is enabled on both devices. I’ve also occasionally used a Bluetooth keyboard connected to my phone to navigate apps on my Samsung TV, which can be more convenient than using the TV remote for typing.

  • How to Transfer Data from Old Phone to New Samsung

    How to Transfer Data from Old Phone to New Samsung

    Upgrading to a new Samsung smartphone is an exciting experience, but transferring data from your old phone can be a daunting task. Whether you’re moving from another Samsung device, an Android phone, or even an iPhone, it’s essential to ensure that all your important files, contacts, apps, and messages make the transition seamlessly. In this guide, we’ll explain how to transfer data from old phone to new Samsung, using different methods suited to various devices and preferences.

    Why Transferring Data is Important

    Switching to a new phone without losing any essential data is crucial. Here are some reasons why transferring data properly matters:

    • Preserve Important Information – Keep contacts, messages, apps, and settings intact.
    • Save Time – Avoid reconfiguring settings and downloading everything manually.
    • Ensure a Smooth Transition – Continue using your phone as usual without disruption.

    Now, let’s dive into how to transfer data from old phone to new Samsung using different methods.


    Method 1: Using Samsung Smart Switch

    Samsung’s Smart Switch is the most efficient way to transfer data, whether you’re moving from an old Samsung phone, another Android device, or an iPhone.

    Step 1: Install Smart Switch

    1. Ensure that Samsung Smart Switch is installed on both devices.
    2. On Samsung devices, it is pre-installed, but you can download it from the Google Play Store or Galaxy Store if needed.

    Step 2: Choose a Transfer Method

    Smart Switch offers three main ways to transfer data:

    • Wireless Transfer – Direct phone-to-phone transfer without cables.
    • USB Cable Transfer – Faster and more stable, ideal for large files.
    • PC/Mac Transfer – Backup and restore via a computer.

    Step 3: Transfer Data Wirelessly (Recommended for Most Users)

    1. Open Smart Switch on both phones.
    2. Select Send Data on the old phone and Receive Data on the new Samsung phone.
    3. Choose Wireless and follow on-screen instructions.
    4. Select the types of data you want to transfer and tap Transfer.
    5. Wait for the process to complete.

    Step 4: Transfer Data Using a USB Cable

    1. Connect both phones using a USB-C to USB-C cable or a USB adapter.
    2. Open Smart Switch and select Cable Transfer.
    3. Follow the prompts to select and transfer data.

    Method 2: Using Google Backup (For Android Users)

    If you have been using Google services for backups, transferring data becomes easy.

    Step 1: Backup Data on Old Phone

    1. Go to Settings > Google > Backup on your old Android phone.
    2. Ensure Back up to Google Drive is enabled.
    3. Tap Back Up Now and wait for the backup to complete.

    Step 2: Restore Backup on New Samsung Phone

    1. Turn on your new Samsung phone and follow the setup instructions.
    2. When prompted, choose Restore from Google Backup.
    3. Sign in with the same Google account used for the backup.
    4. Wait for the restoration to complete.

    Method 3: Transfer Data from iPhone to Samsung

    If you’re switching from an iPhone to a Samsung device, Smart Switch still makes it easy.

    Step 1: Prepare Your iPhone

    1. Ensure iCloud Backup is up to date by going to Settings > [Your Name] > iCloud > iCloud Backup.
    2. If using a cable transfer, get a Lightning to USB-C adapter.

    Step 2: Transfer Data Using Smart Switch

    1. Open Smart Switch on your Samsung phone.
    2. Choose Receive Data and select iPhone/iPad.
    3. Sign in to iCloud or connect via cable.
    4. Select the data you wish to transfer (contacts, messages, photos, etc.).
    5. Start the transfer and wait for completion.

    Method 4: Transfer Using a MicroSD Card or USB Drive

    If your old phone has a microSD card slot or you have a USB drive with an adapter, this can be an easy way to transfer files.

    Step 1: Backup Data on Old Phone

    1. Insert a microSD card or USB drive into your old phone.
    2. Move important files (photos, documents, videos) to the external storage.

    Step 2: Restore Data on New Samsung Phone

    1. Insert the microSD card or USB drive into the new Samsung phone.
    2. Copy the backed-up files to the internal storage.

    Method 5: Transfer Data Using Bluetooth or Wi-Fi Direct

    If you only need to transfer small files like photos or contacts, Bluetooth or Wi-Fi Direct can be a quick solution.

    Step 1: Enable Bluetooth or Wi-Fi Direct

    1. Enable Bluetooth on both devices.
    2. Pair the two phones by going to Settings > Bluetooth.

    Step 2: Send Files

    1. Open the File Manager or Gallery app.
    2. Select the files you want to transfer.
    3. Tap Share > Bluetooth or Wi-Fi Direct and select the new Samsung phone.
    4. Accept the transfer on the new phone and wait for the files to be received.

    Additional Tips for a Smooth Data Transfer

    • Check Available Storage – Ensure your new Samsung phone has enough space for all transferred files.
    • Use a Stable Wi-Fi Connection – For cloud backups, a strong connection ensures a faster and smoother process.
    • Keep Both Devices Charged – Data transfer can take time, so ensure both phones have enough battery life.
    • Clear Unnecessary Files – Before transferring, delete old or unwanted data to save space.
    • Update Both Devices – Ensure that both phones have the latest software updates for compatibility.

    Final Thoughts

    Learning how to transfer data from old phone to new Samsung ensures that you don’t lose important files, messages, or settings when upgrading your device. Whether you use Samsung Smart Switch, Google Backup, iCloud, or other methods, the key is choosing the right transfer method based on your devices and preferences. By following this guide, you can seamlessly switch to your new Samsung phone and enjoy its features without any data loss.

  • How to Unlock a Samsung Phone Without a Password

    How to Unlock a Samsung Phone Without a Password

    Forgot your Samsung phone password? Don’t panic—you’re not alone. Many people find themselves locked out of their devices due to a forgotten PIN, pattern, or password. Thankfully, there are several methods to regain access to your phone without losing essential data. This blog will guide you through the steps on how to unlock a Samsung phone without a password using reliable techniques.

    Why You Might Need to Unlock a Samsung Phone Without a Password

    People often forget their phone passwords due to various reasons:

    1. Setting a new password and forgetting it shortly after.
    2. Children or friends accidentally locking the device.
    3. Entering the wrong password multiple times, resulting in a locked device.

    No matter the cause, the solutions below will help you unlock your Samsung phone quickly and safely.


    1. Using Samsung Find My Mobile

    Samsung provides a convenient service called “Find My Mobile” that allows users to remotely unlock their phones. This feature works if you’ve set up a Samsung account on the device before getting locked out.

    Steps:

    1. Visit the Samsung Find My Mobile website on a computer or another phone.
    2. Log in with the same Samsung account credentials used on the locked phone.
    3. Once logged in, locate your device on the dashboard.
    4. Select the “Unlock” option and follow the on-screen instructions.
    5. Your phone will unlock, allowing you to set a new password.

    Note: This method works only if your device is connected to the internet and has the “Find My Mobile” feature enabled.


    2. Using Google’s Find My Device

    If you’ve linked your Samsung phone to a Google account, you can use Google’s Find My Device service to unlock it. However, this method often requires you to erase the phone’s data.

    Steps:

    1. Go to the Google Find My Device website on another device.
    2. Sign in with your Google account credentials.
    3. Select the locked Samsung phone from the list of devices.
    4. Click on the “Erase Device” option. This will reset your phone to factory settings and remove the password.

    Important: This method will delete all the data on your device unless you’ve backed it up beforehand.


    3. Using Smart Lock

    Samsung’s Smart Lock feature can help you unlock your phone without a password if it’s enabled. Smart Lock keeps your phone unlocked in certain trusted situations, such as when connected to a specific Wi-Fi network or when it detects a trusted device nearby.

    Steps:

    1. Ensure your phone is in a trusted location or connected to a trusted device (e.g., a smartwatch or Bluetooth speaker).
    2. Your phone should automatically unlock if the Smart Lock criteria are met.
    3. Once unlocked, reset your password through the phone’s security settings.

    4. Using Recovery Mode to Perform a Factory Reset

    If none of the above methods work, you can use Recovery Mode to perform a factory reset. While this will erase all data on your phone, it’s an effective way to regain access.

    Steps:

    1. Turn off your Samsung phone.
    2. Press and hold the Volume Up, Power, and Home (if available) buttons simultaneously until the Samsung logo appears.
    3. Use the volume buttons to navigate to “Wipe data/factory reset” and select it using the Power button.
    4. Confirm the action and wait for the reset process to complete.
    5. Once the phone restarts, you can set it up as a new device.

    Caution: This method will delete all personal data, so use it as a last resort.


    5. Using Third-Party Software

    Several third-party tools are designed to unlock Samsung phones without passwords. These tools often support various models and can bypass locks without erasing data.

    Popular Tools:

    • Dr.Fone – Screen Unlock (Android): This software can remove screen locks on many Android devices, including Samsung.
    • iMyFone LockWiper (Android): Another reliable option for bypassing PINs, patterns, and passwords.

    Steps:

    1. Download and install the unlocking software on your computer.
    2. Connect your Samsung phone to the computer using a USB cable.
    3. Follow the on-screen instructions to bypass the lock.

    Note: Ensure you download these tools from their official websites to avoid malware or scams.


    6. Contact Samsung Support

    If all else fails, reaching out to Samsung support may be your best option. They can guide you through unlocking your device or recommend a certified repair center.

    Steps:

    1. Visit the Samsung Support page.
    2. Enter your phone’s model number and describe your issue.
    3. Follow their recommendations or schedule a service appointment.

    Preventing Future Lockouts

    After successfully unlocking your Samsung phone, take these steps to prevent similar issues in the future:

    1. Set Up Biometric Authentication: Use fingerprint or face recognition for easier access.
    2. Enable Find My Mobile: Ensure this feature is active to allow remote unlocking.
    3. Write Down Your Password: Store it in a secure location or use a password manager.
    4. Regular Backups: Keep your data backed up to prevent loss during emergencies.

    Conclusion

    Forgetting your Samsung phone password can be stressful, but there are multiple ways to resolve the issue. Whether you use Samsung’s Find My Mobile, Google’s Find My Device, Smart Lock, or third-party software, you now know how to unlock a Samsung phone without a password. Remember to take precautions to avoid getting locked out again and always back up your data for added peace of mind.

    With these solutions at your disposal, you’ll never have to worry about being locked out of your Samsung phone again. Whether you’re tech-savvy or a beginner, these methods provide reliable options for accessing your device.

  • Best Budget Samsung Smartphone

    Best Budget Samsung Smartphone

    The Best Budget Samsung Smartphone: Affordable Excellence

    When it comes to smartphones, Samsung is a name synonymous with innovation and quality. Known for its flagship devices like the Galaxy S and Z series, Samsung also excels in the budget smartphone category, offering feature-packed options at affordable prices. For those seeking quality without breaking the bank, the best budget Samsung smartphone can deliver an exceptional experience, blending performance, design, and value.

    In this blog, we’ll explore why Samsung is a reliable choice for budget smartphones, highlight some top models, and offer tips for choosing the best budget Samsung smartphone to suit your needs.


    Why Choose a Samsung Budget Smartphone?

    Samsung has solidified its reputation as a leading smartphone manufacturer, catering to all price ranges. Here’s why their budget smartphones are worth considering:

    1. Trusted Brand: Samsung’s extensive expertise ensures even its affordable models maintain a high standard of quality.
    2. Wide Range of Choices: From the Galaxy A series to the Galaxy M series, Samsung offers a variety of budget-friendly options.
    3. Advanced Features: Samsung incorporates features like AMOLED displays, powerful processors, and long-lasting batteries into its budget smartphones.
    4. Software Updates: Samsung provides regular updates for most of its devices, ensuring security and performance improvements.
    5. Service and Support: With a global presence, Samsung’s after-sales service is reliable and accessible.

    Top Picks for the Best Budget Samsung Smartphone in 2025

    1. Samsung Galaxy A14 5G

    Price Range: $200–$250

    The Galaxy A14 5G is an excellent example of how Samsung balances affordability and functionality.

    • Display: A 6.6-inch FHD+ PLS LCD screen with a 90Hz refresh rate for smooth visuals.
    • Performance: Powered by the MediaTek Dimensity 700 or Exynos 1330 (varies by region), it delivers reliable performance for everyday tasks and casual gaming.
    • Battery: A 5000mAh battery ensures all-day usage, supported by 15W fast charging.
    • Camera: Triple camera setup with a 50MP primary sensor, 2MP macro lens, and 2MP depth sensor for versatile photography.

    This model is ideal for users looking for a 5G-enabled device at a low price.


    2. Samsung Galaxy M14 5G

    Price Range: $180–$230

    The Galaxy M14 5G is part of Samsung’s M series, known for its robust battery life and practical features.

    • Display: A 6.6-inch PLS LCD with Full HD+ resolution.
    • Processor: It’s equipped with the Exynos 1330 chipset, delivering smooth multitasking and gaming experiences.
    • Battery: A massive 6000mAh battery makes it perfect for heavy users.
    • Camera: A triple-camera setup featuring a 50MP main sensor ensures sharp and detailed photos.

    With its large battery and capable performance, the Galaxy M14 5G is a great option for students and professionals alike.


    3. Samsung Galaxy A04s

    Price Range: $120–$150

    For users with a tighter budget, the Galaxy A04s delivers core features without compromising quality.

    • Display: A 6.5-inch HD+ PLS LCD display with a 90Hz refresh rate.
    • Processor: Exynos 850 provides efficient performance for light use.
    • Battery: A 5000mAh battery ensures you don’t run out of power during the day.
    • Camera: A 50MP primary camera supported by macro and depth sensors.

    This is one of the best budget Samsung smartphones for users who need a reliable device for everyday tasks like calling, browsing, and streaming.


    4. Samsung Galaxy A13

    Price Range: $150–$200

    The Galaxy A13 is a stylish budget phone with great camera capabilities.

    • Display: A 6.6-inch PLS LCD with Full HD+ resolution for vivid visuals.
    • Processor: Exynos 850 chipset delivers smooth performance.
    • Battery: A 5000mAh battery with 15W fast charging ensures convenience.
    • Camera: Quad-camera setup with a 50MP main sensor for excellent photos.

    Its sleek design and solid camera make it a great option for content creators on a budget.


    5. Samsung Galaxy M04

    Price Range: $100–$130

    If affordability is your top priority, the Galaxy M04 is a no-frills smartphone that covers the basics.

    • Display: A 6.5-inch HD+ PLS LCD display.
    • Processor: MediaTek Helio P35 chipset for basic multitasking.
    • Battery: A 5000mAh battery for all-day performance.
    • Camera: Dual-camera setup with a 13MP primary sensor.

    This is a perfect choice for first-time smartphone users or as a secondary device.


    How to Choose the Best Budget Samsung Smartphone

    When selecting the best budget Samsung smartphone, consider these factors:

    1. Purpose of Use:
      • For gaming or multitasking, opt for a device with a powerful processor like the Galaxy A14 5G.
      • For basic use, the Galaxy M04 or A04s will suffice.
    2. Camera Requirements:
      • If photography is important, choose models with advanced camera setups like the Galaxy A13.
    3. Battery Life:
      • Heavy users should prioritize phones with large batteries, such as the Galaxy M14 5G.
    4. 5G Compatibility:
      • Future-proof your device by selecting a 5G-enabled model like the Galaxy A14 or M14.
    5. Display Quality:
      • Look for FHD+ displays if you frequently watch videos or browse content.
    6. Budget:
      • Samsung offers quality options in various price ranges, so set a budget and choose accordingly.

    Tips to Maximize Your Samsung Budget Smartphone Experience

    • Update Software Regularly: Keep your phone up-to-date for improved security and performance.
    • Use Samsung Ecosystem Features: Take advantage of Samsung services like SmartThings and Samsung Health.
    • Protect Your Device: Invest in a durable case and screen protector to extend the phone’s life.

    Conclusion

    Samsung continues to dominate the budget smartphone market by offering reliable, feature-rich devices at affordable prices. Whether you prioritize camera quality, battery life, or 5G connectivity, there’s a Samsung phone that fits your needs and budget.

    Choosing the best budget Samsung smartphone ensures you get a device that balances performance and value. With options like the Galaxy A14 5G, Galaxy M14, and Galaxy A04s, Samsung proves that quality doesn’t always come with a hefty price tag.

  • Samsung unveils Oculus-powered ‘Gear VR Innovator Edition’

    Samsung unveils Oculus-powered ‘Gear VR Innovator Edition’

    During its developer conference in San Francisco, Samsung today announced the Oculus-powered ‘Gear VR Innovator Edition’. The new VR headset is compatible with the Galaxy Note 4’s 5.7-inch display for developers to create a 360-degree immersive experience.

    Developers can access the Oculus Mobile SDK for Gear VR, now available at develper.oculus.com. Once users download the Oculus software to their Note 4 devices, they will receive special applications such as Cinema, Home, Store, and 360 Videos and Photos to work with.

    Some of the content partners that Samsung has tied up with include Harmonix, DreamWorks, Vevo, and Temple Run.

    The Gear VR features a touchpad, back button, and a focus adjustment wheel. The Gear VR Innovator Edition is currently available only in the US, and starts shipping in ‘early December’. However, Samsung is yet to announce the pricing.